Before starting this article I assumed that you have installed the latest version node.js, yarn/npm and visual studio code. If not download node.js from here, yarn from here, and visual studio code from here.
Basically, Webpack is a bundler rather than a task runner. It can bundle all of your JavaScript files, stylesheets images, and other files also and make them readable for browser even if it is a very old one. Now, let’s go we start our journey!
Instructions
Creating project infrastructure
Webpack is fully configurable and the developer gets more than enough freedom to set up their app infrastructure. From my experience, I have created a standard structure so that, it can be more manageable and better lookings. So, Let’s create a folder for the project and name it webpack-demo. Create a project structure like this image.

Open
command promptor PowerShell or any command-line tool you prefer and navigate to the project folder. writeyarn init(for npm use npm instead of yarn) command and press enter. It will create a package.json file in the root directory. package.json will contain all of the used libraries and plugins references alongside build commands and other info about project structure.Code Block language json { "name": "webpack-demo", "version": "1.0.0", "description": "Webpack Demo", "main": "index.js", "author": "Faisal AL Mahmud", "license": "MIT" }
Configure webpack
Edit package.json file and set main.js instead of index.js. Create a new object for scripts and set a property name
serveto run a command for dev mode. So, package.json will be like:Code Block language json { "name": "webpack-demo", "version": "1.0.0", "description": "Webpack Demo", "main": "index.js", "author": "Faisal AL Mahmud", "license": "MIT", "scripts": { "serve": "webpack-dev-server" } }webpack-dev-server is a library to run the project in dev mode.
Run
yarn add webpack webpack-cli webpack-dev-serve server --save-devto download webpack dependencies.Run
yarn add html-webpack-plugin --save-devto download to webpack html plugin.Create a file in the root directory and name it webpack.config.js. This file will contain all instructions about the project bundling and build process. Configure this file as below.
Code Block language js const path = require('path'); const HtmlWebpackPlugin = require('html-webpack-plugin'); let htmlOptions = { template: './src/app/index.html', minify: { collapseWhitespace: true, removeAttributeQuotes: true } }; module.exports = { entry: './src/app/js/main.js', output: { path: path.resolve(__dirname, 'dist'), filename: '[hash].[name].js' }, devServer: { contentBase: './src/app', hot: true, port: 4200 //port for development server }, plugins: [ new HtmlWebpackPlugin(htmlOptions) ] };Edit index.html file with minimum tags.
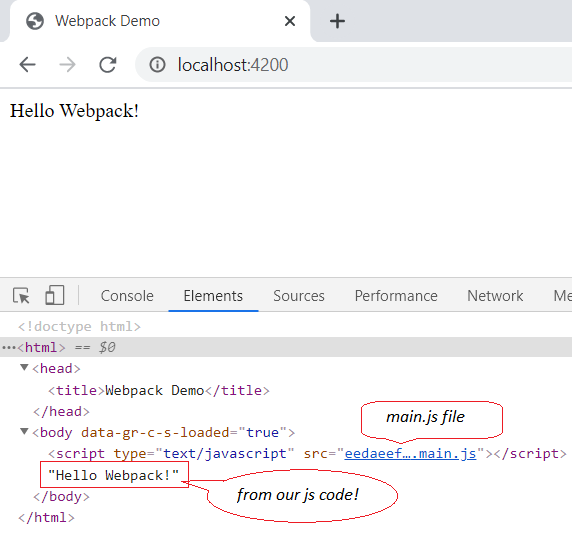
Code Block language html <!DOCTYPE html> <html> <head> <title>Webpack Demo</title> </head> <body> </body> </html>And main.js will be
Code Block language js document.write("Hello Webpack!");
Now run yarn serve command and look at the console for …
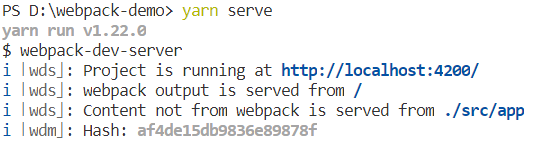
Navigate to http://localhost:4200/ to see our application.
Add Stylesheets
Write some CSS in custom.scss file.
Code Block language css $bgcolor: lightblue; $textcolor: darkblue; $fontsize: 18px; /* Use the variables */ body { background-color: $bgcolor; color: $textcolor; font-size: $fontsize; }import custom.scss file into main.js
Code Block language js import '../assets/styles/custom.scss';
To compile CSS code we will use a plugin. MiniCssExtractPlugin is the mostly use plugin to compile CSS. Run
yarn add mini-css-extract-plugin--save-devto download it. Add two extra loaders to handle CSS code if MiniCssExtractPlugin fails. Useyarn add css-loader sass-loader --save-devto download. Add a rules for stylesheets in config file.Code Block language js { test: /\.(sa|sc|c)ss$/, use: [ { loader: MiniCssExtractPlugin.loader, }, 'css-loader', 'sass-loader', ] }Now configure
MiniCssExtractPluginto set output directory for compiled CSS files.Code Block language js new MiniCssExtractPlugin({ filename: './assets/styles/[name].css', chunkFilename: './assets/styles/[id].css', }),Build project (
yarn serve) and see the output.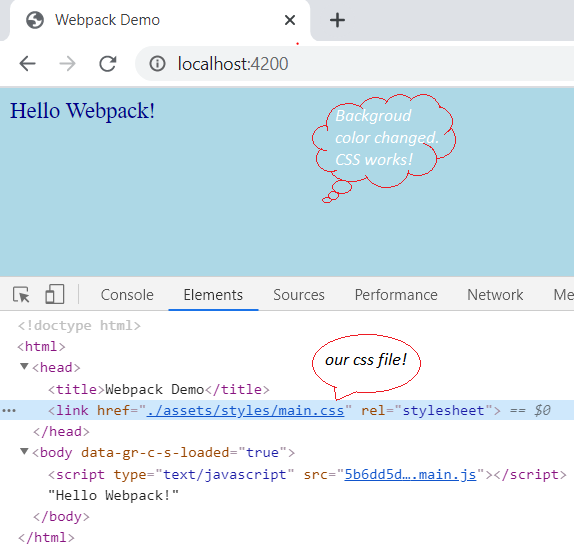
Configure Bootstrap.
To configure bootstrap install bootstrap use
yarn add bootstrap --save-devcommand. Bootstrap has a dependency on Popper.js and jQuery. ButPopper.jsis now declared as deprecated and they recommendpopperjs/core. And I also love to use the updatedjQueryversion. So, let installpopperjs/coreandjQuery(yarn add popperjs/core jquery --save-dev).Update styles.scss file using the following lines.
Code Block language js @import "~bootstrap/scss/bootstrap"; @import "custom"; /* custom css */
Update the main.js file.
Code Block language js // js bundle "use strict"; import '../assets/styles/styles.scss'; import '../js/app'
Add some div with bootstrap class in index.html file.
Code Block <div class="container"> <div class="jumbotron"> <h1>Webpack Demo</h1> <p>Bootstrap is the most popular HTML, CSS, and JS framework for developing responsive, mobile-first projects on the web.</p> </div> </div>Now run
yarn serveto see updates.
Handling files
To Handling files in webpack we need a loader. In this demo, I use
file-loader. Install it usingyarn add file-loader --save-devcommand.Add new rules to handle files in webpack.config.js.
Code Block language js { test: /\.(jpeg|jpg|png|gif|svg)$/, use: [ { loader: 'file-loader', options: { name: '[name].[ext]', outputPath: 'assets/images', sourcemap: true } } ] }Import desired file in app.js
Code Block language js import '../assets/images/1_0V9PsiedHEzXJRlouOazZA.gif' //sample image file
Add an img tag in index.html
Code Block language html <img src="./assets/images/1_0V9PsiedHEzXJRlouOazZA.gif">
Run
yarn serveto see updates
Production build
Now, our app is ready. To deploy it we need to build it for production. At first, we have to update the package.json to start the production build process. Add this snippet under serve property.
Code Block language json "build": "webpack"
Run
yarn buildcommand. A new folder will be created in the root directory name dist. Dist folder will contain compiled CSS, JS, Files, and HTML. Now it’s ready to deploy.Enjoy!
...
Full source code is available on github.
| Info |
|---|
Related articles
| Filter by label (Content by label) | ||||||||||||||||||
|---|---|---|---|---|---|---|---|---|---|---|---|---|---|---|---|---|---|---|
|
| Page Properties | ||
|---|---|---|
| ||
|